

How To Draw Text In Python
Drawing Text on Images with Pillow and Python
Pillow supports cartoon text on your images in improver to shapes. Pillow uses its own font file format to store bitmap fonts, limited to 256 characters. Pillow also supports TrueType and OpenType fonts too as other font formats supported by the FreeType library. In this chapter, yous will acquire almost the following: While this commodity is not completely exhaustive in its coverage of cartoon text with Pillow, when you lot accept finished reading it, you will have a proficient understanding of how text drawing works and be able to draw text on your ain. Let's go started past learning how to draw text. Drawing text with Pillow is similar to drawing shapes. However, drawing text has the added complexity of needing to be able to handle fonts, spacing, alignment, and more. Yous can get an idea of the complexity of drawing text by taking a wait at the This role takes in a lot more than parameters than whatever of the shapes y'all can draw with Pillow! Let's go over each of these parameters in turn: You probably won't utilize well-nigh of these parameters are on a regular footing unless your job requires yous to work with strange languages or arcane font features. When it comes to learning something new, information technology'southward always proficient to start with a squeamish example. Open up upwardly your Python editor and create a new file named Here you create a pocket-size image using Pillow's When yous run this code, yous will get the following image: That looks pretty good. Ordinarily, when you are drawing text on an image, you would specify a font. If you don't accept a font handy, y'all can utilize the method in a higher place or you lot can use Pillow'southward default font. Here is an case that updates the previous example to employ Pillow'southward default font: north this version of the lawmaking, you employ The output of this code will be the same as the first example. Now let'southward discover how to apply a TrueType font with Pillow! Pillow supports loading TrueType and OpenType fonts. Then if you take a favorite font or a visitor mandated one, Pillow can probably load information technology. In that location are many open source TrueType fonts that you tin can download. One popular selection is Gidole, which you tin go here: The Pillow package also comes with several fonts in its test folder. You tin download Pillow'due south source here: This book'southward lawmaking repository on Github includes the Gidole font as well as a handful of the fonts from the Pillow tests folder that you can use for the examples in this chapter: To see how you can load up a TrueType font, create a new file and proper name information technology For this example, you use the Gidole font and load an image taken at the Dallas Arboretum in Texas: Then you loop over several different font sizes and write out a string at different positions on the epitome. When y'all run this lawmaking, you volition create an epitome that looks like this: That code demonstrated how to change font sizes using a TrueType font. Now you're ready to learn how to switch between unlike TrueType fonts. Create some other new file and name this one Here you utilise Python's When you run this lawmaking, your new prototype volition wait like this: This demonstrates writing text with multiple formats in a unmarried code example. Y'all always need to provide a relative or absolute path to the TrueType or OpenType font file that y'all desire to load. If y'all don't provide a valid path, a Now let'due south move on and larn how to alter the colour of your text! Pillow allows you to change the color of your text by using the Go ahead and create a new file and name it In this case, you create a new white image. So you lot create a list of colors. Next, you loop over each color in the listing and apply the color using the When you run this lawmaking, you volition end up with this nice output: This output demonstrates how yous can modify the colour of your text. Now allow'south learn how to draw multiple lines of text at once! Pillow also supports drawing multiple lines of text at once. In this section, you lot volition larn two unlike methods of drawing multiple lines. The kickoff is by using Python's newline character: To run into how that works, create a file and name information technology For this case, y'all create a string with the newline character inserted in the heart. When y'all run this case, your result should wait similar this: Pillow has a congenital-in method for drawing multiple lines of text too. Accept the lawmaking you wrote in the instance above and copy and paste it into a new file. Save your new file and name information technology Now modify the code and then that it uses the In this example, you create a multiline string using Python's triple quotes. So yous draw that string onto your image by calling When you lot run this lawmaking, your image volition be slightly different: The text is positioned down and to the right of the previous example. The reason is that y'all used Python's triple quotes to create the string. Information technology retains the newline and indentation that you gave information technology. If y'all put this string into the previous example, it should look the aforementioned. The At present permit's learn how you can marshal text when you draw information technology. Pillow lets y'all align text. However, the alignment is relative to the anchor and applies to multiline text but. You volition look at an alternative method for aligning text without using the To get started with Here you create a small, white image. Then you create a list of all of the valid alignment options: "left", "center", and "correct". Next, you loop over these alignment values and apply them to the same multiline string. After running this code, you will take the following issue: Looking at the output, you tin can kind of go a feel for how alignment works in Pillow. Whether or not that works for your use-example is up for you to decide. You volition probably need to suit the location of where you start cartoon in improver to setting the Yous tin employ Pillow to go the size of your string and practise some uncomplicated math to try to center it though. You can apply either the Drawing object's To see how that works, yous can create a new file named In this instance, you keep track of the epitome'south size as well as the string's size. For this case, you used Then yous took the image width and height and subtracted the width and height of the cord and divided by two. This should go you the coordinates you need to write the text in the center of the image. When y'all run this code, you lot tin can see that the text is centered pretty well: Nevertheless, this starts to fall nigh as y'all increase the size of the font. The more you increase it, the further off-center it is. There are several alternative solutions on StackOverflow here: The main takeaway though is that you lot will probably cease up needing to calculate your own offset for the font that yous are using. Typesetting is a complicated business, after all. Now let's detect out how to change your text's opacity! Pillow supports changing the text'south opacity as well. What that means is that you can make the text transparent, opaque or somewhere in between. This merely works with images that have an alpha channel. For this example, you will use this flower epitome: Now create a new file and proper noun it In this example, you open the flower prototype and convert it to RGBA. And so you create a new paradigm that is the aforementioned size equally the flower image. Side by side, yous load the Gidole font and create a drawing context object using the custom prototype you just created. At present comes the fun part! You draw ane string and ready the alpha value to 128, which equates to well-nigh half opacity. Then y'all draw a second string on the following line and tell Pillow to utilize full opacity. Note that in both of these instances, you are using RGBA values rather than color names, like you did in your previous lawmaking examples. This gives you lot more versatility in setting the alpha amount. The last step is to call When you run this code, your output volition look like this: This demonstrates how you can change the opacity of your text with Pillow. Y'all should attempt a few different values for your Now permit's learn what text anchors are and how they affect text placement. You can employ the The first alphabetic character in an anchor specifies it'southward horizontal alignment while the 2nd letter specifies its vertical alignment. In the next two sub-sections, yous will acquire what each of the anchor names mean. There are 4 horizontal anchors. The post-obit is an adaptation from the documentation on horizontal anchors: There are six vertical anchors. The post-obit is an adaptation from the documentation on vertical anchors: Anchors are hard to visualize if all you do is talk about them. It helps a lot if you create some examples to see what actually happens. Pillow provides an example in their documentation on anchors along with some very helpful images: You lot tin have their example and adapt information technology a bit to go far more useful. To come across how, create a new file and proper name it Y'all can run this lawmaking as-is. The default anchor is "la", merely y'all explicitly call that out here. You also draw a cantankerous-pilus to mark where the Hither is a screenshot from vi unlike runs using six different anchors: You lot can try running this lawmaking with some of the other anchors that aren't shown here. You tin can besides adjust the position tuple and re-run it again with different anchors. You could even create a loop to loop over the anchors and create a prepare of examples if y'all wanted to. At this point you have a good understanding of how to depict text using Pillow. In fact, you learned how to do all of the following: You tin can now have what you have learned and practice it. There are lots of examples in this commodity that y'all tin can use equally jumping off points to create new applications!
Drawing Text
text() function'due south signature: def text(xy, text, fill = None, font = None, anchor = None, spacing = 4, marshal = 'left', management = None, features = None, language = None, stroke_width = 0, stroke_fill = None, embedded_color = False)
xy - The anchor coordinates for the text (i.e. where to kickoff drawing the text).text - The string of text that you wish to draw.fill - The color of the text (can a tuple, an integer (0-255) or one of the supported color names).font - An ImageFont instance.anchor - The text anchor alignment. Determines the relative location of the anchor to the text. The default alignment is top left.spacing - If the text is passed on to multiline_text(), this controls the number of pixels between lines.marshal - If the text is passed on to multiline_text(), "left", "center" or "right". Determines the relative alignment of lines. Use the anchor parameter to specify the alignment to xy.direction - Direction of the text. Information technology can be "rtl" (right to left), "ltr" (left to right) or "ttb" (summit to bottom). Requires libraqm.features - A list of OpenType font features to exist used during text layout. Requires libraqm.language - The language of the text. Different languages may apply different glyph shapes or ligatures. This parameter tells the font which linguistic communication the text is in, and to apply the correct substitutions as appropriate, if bachelor. It should be a BCP 47 linguistic communication code. Requires libraqm.stroke_width - The width of the text strokestroke_fill - The color of the text stroke. If you don't set this, it defaults to the make full parameter's value.embedded_color - Whether to apply font embedded colour glyphs (COLR or CBDT).draw_text.py. So add this code to it:# draw_text.py from PIL import Image, ImageDraw, ImageFont def text(output_path): epitome = Prototype.new("RGB", (200, 200), "dark-green") draw = ImageDraw.Draw(image) draw.text((ten, 10), "Hello from") draw.text((10, 25), "Pillow",) image.save(output_path) if __name__ == "__main__": text("text.jpg") Image.new() method. It has a prissy greenish background. Then you create a drawing object. Next, y'all tell Pillow where to depict the text. In this example, you draw two lines of text.
# draw_text_default_font.py from PIL import Paradigm, ImageDraw, ImageFont def text(output_path): image = Image.new("RGB", (200, 200), "green") draw = ImageDraw.Draw(image) font = ImageFont.load_default() describe.text((ten, x), "Howdy from", font=font) describe.text((10, 25), "Pillow", font=font) image.salvage(output_path) if __name__ == "__main__": text("text.jpg") ImageFont.load_default() to load up Pillow'south default font. And so y'all apply the font to the text, y'all pass it in with the font parameter.Loading TrueType Fonts
draw_truetype.py. And so enter the following:# draw_truetype.py from PIL import Image, ImageDraw, ImageFont def text(input_image_path, output_path): image = Image.open up(input_image_path) draw = ImageDraw.Depict(paradigm) y = 10 for font_size in range(12, 75, 10): font = ImageFont.truetype("Gidole-Regular.ttf", size=font_size) draw.text((10, y), f"Chihuly Showroom ({font_size=}", font=font) y += 35 image.save(output_path) if __name__ == "__main__": text("chihuly_exhibit.jpg", "truetype.jpg") 

draw_multiple_truetype.py. Then put this code into it:# draw_multiple_truetype.py import glob from PIL import Image, ImageDraw, ImageFont def truetype(input_image_path, output_path): image = Paradigm.open(input_image_path) depict = ImageDraw.Describe(image) y = 10 ttf_files = glob.glob("*.ttf") for ttf_file in ttf_files: font = ImageFont.truetype(ttf_file, size=44) depict.text((10, y), f"{ttf_file} (font_size=44)", font=font) y += 55 paradigm.relieve(output_path) if __name__ == "__main__": truetype("chihuly_exhibit.jpg", "truetype_fonts.jpg") glob module to search for files with the extension .ttf. So you loop over those files and write out the font name on the image using each of the fonts that glob found.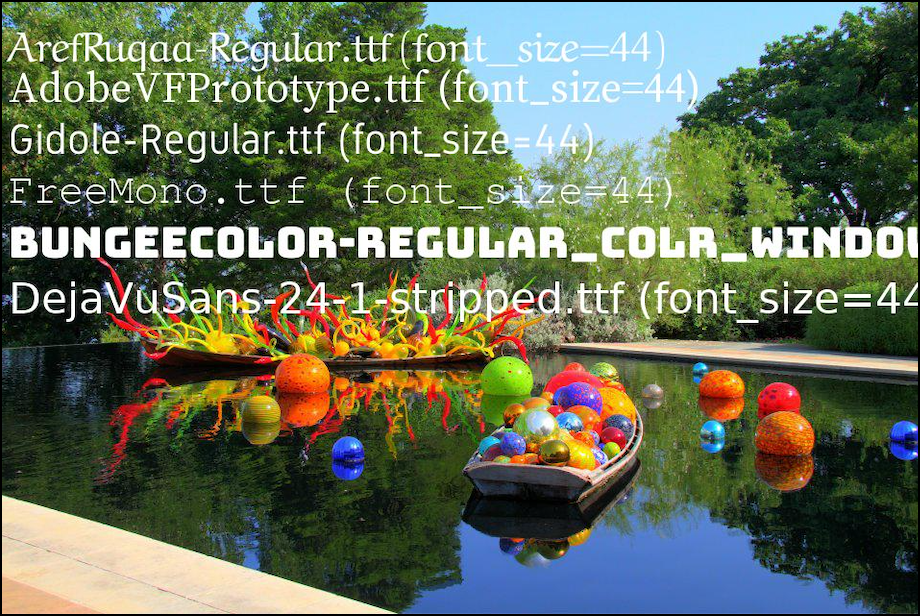
FileNotFoundError exception will exist raised.Changing Text Color
fill parameter. You tin prepare this color using an RGB tuple, an integer or a supported color name.text_colors.py. Then enter the post-obit code into it:# text_colors.py from PIL import Epitome, ImageDraw, ImageFont def text_color(output_path): image = Image.new("RGB", (200, 200), "white") draw = ImageDraw.Draw(image) colors = ["dark-green", "bluish", "red", "yellow", "royal"] font = ImageFont.truetype("Gidole-Regular.ttf", size=12) y = 10 for color in colors: describe.text((10, y), f"Hello from Pillow", font=font, fill=color) y += 35 prototype.save(output_path) if __name__ == "__main__": text_color("colored_text.jpg") fill up parameter.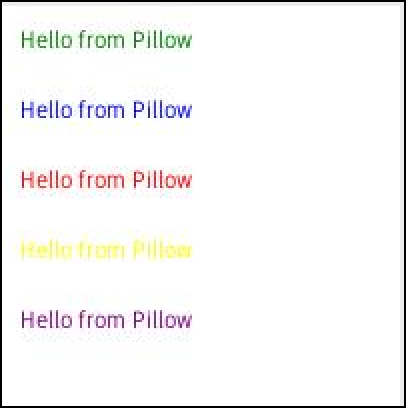
Drawing Multiple Lines of Text
\north.draw_multiline_text.py. So add the post-obit code:# draw_multiline_text.py from PIL import Image, ImageDraw, ImageFont def text(input_image_path, output_path): image = Prototype.open(input_image_path) draw = ImageDraw.Draw(image) font = ImageFont.truetype("Gidole-Regular.ttf", size=42) text = "Chihuly Showroom\nDallas, Texas" draw.text((10, 25), text, font=font) image.save(output_path) if __name__ == "__main__": text("chihuly_exhibit.jpg", "multiline_text.jpg") 
draw_multiline_text_2.py.multiline_text() function:# draw_multiline_text_2.py from PIL import Image, ImageDraw, ImageFont def text(input_image_path, output_path): paradigm = Prototype.open(input_image_path) describe = ImageDraw.Describe(image) font = ImageFont.truetype("Gidole-Regular.ttf", size=42) text = """ Chihuly Exhibit Dallas, Texas""" draw.multiline_text((10, 25), text, font=font) image.save(output_path) if __name__ == "__main__": text("chihuly_exhibit.jpg", "multiline_text_2.jpg") multiline_text().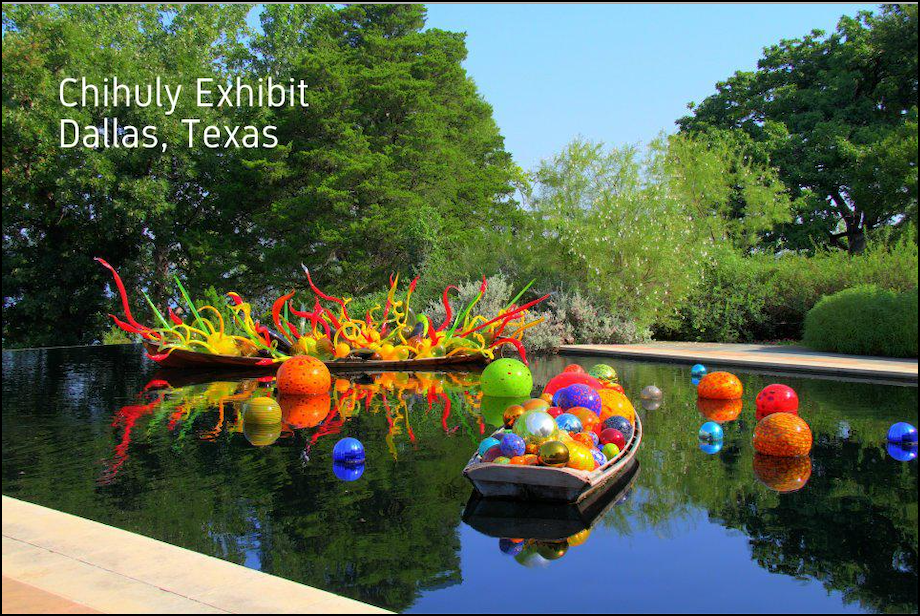
multiline_text() doesn't affect the cease result.Aligning Text
align parameter in this section every bit well.align, create a new file and name it text_alignment.py. Then add together the following lawmaking:# text_alignment.py from PIL import Epitome, ImageDraw, ImageFont def alignment(output_path): image = Paradigm.new("RGB", (200, 200), "white") depict = ImageDraw.Draw(image) alignments = ["left", "center", "correct"] y = 10 font = ImageFont.truetype("Gidole-Regular.ttf", size=12) for alignment in alignments: draw.text((10, y), f"Hello from\northward Pillow", font=font, align=alignment, fill="black") y += 35 image.save(output_path) if __name__ == "__main__": alignment("aligned_text.jpg") 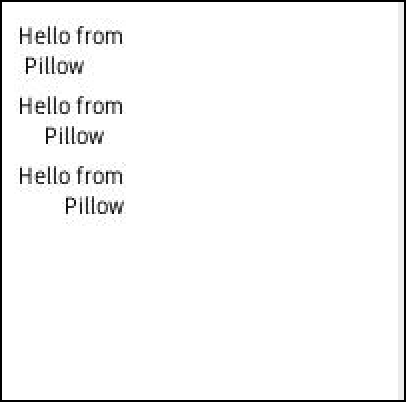
align parameter to get what you really want.textsize() method or the font object'southward getsize() method for that.center_text.py and put this code into it:# center_text.py from PIL import Paradigm, ImageDraw, ImageFont def center(output_path): width, tiptop = (400, 400) image = Epitome.new("RGB", (width, peak), "gray") depict = ImageDraw.Describe(epitome) font = ImageFont.truetype("Gidole-Regular.ttf", size=12) text = "Pillow Rocks!" font_width, font_height = font.getsize(text) new_width = (width - font_width) / 2 new_height = (elevation - font_height) / ii draw.text((new_width, new_height), text, fill="black") epitome.relieve(output_path) if __name__ == "__main__": centre("centered_text.jpg") getsize() to get the string's width and height based on the the font and the size of the font.
Changing Text Opacity
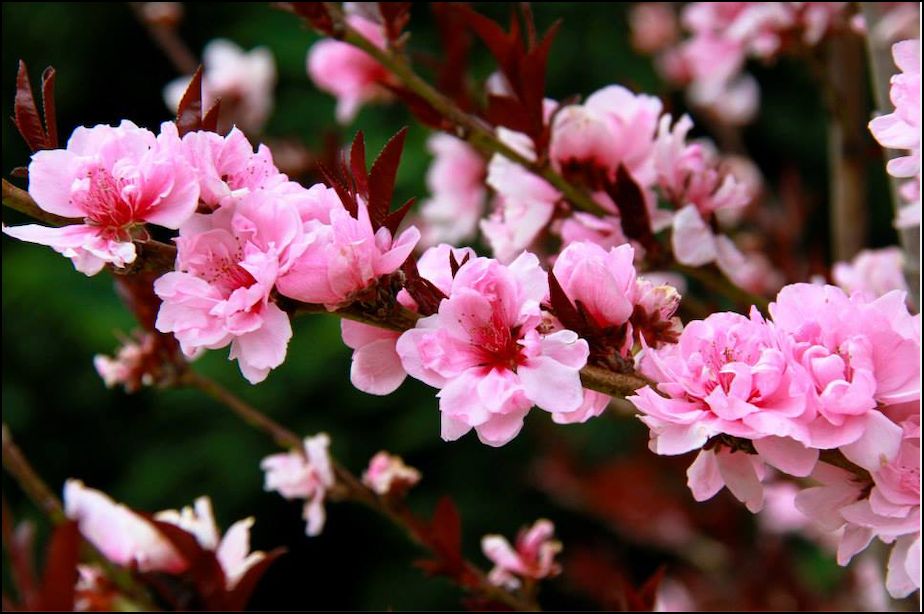
text_opacity.py. And so add the following lawmaking to your new file:# text_opacity.py from PIL import Image, ImageDraw, ImageFont def change_opacity(input_path, output_path): base_image = Image.open(input_path).convert("RGBA") txt_img = Image.new("RGBA", base_image.size, (255,255,255,0)) font = ImageFont.truetype("Gidole-Regular.ttf", 40) draw = ImageDraw.Depict(txt_img) # draw text at half opacity draw.text((x,10), "Pillow", font=font, fill=(255,255,255,128)) # draw text at full opacity draw.text((x,60), "Rocks!", font=font, fill=(255,255,255,255)) composite = Paradigm.alpha_composite(base_image, txt_img) composite.relieve(output_path) if __name__ == "__main__": change_opacity("flowers_dallas.png", "flowers_opacity.png") alpha_composite() and composite the txt_img onto the base_image.
txt_img to encounter how information technology changes the text'south opacity.Learning About Text Anchors
anchor parameter to determine the alignment of your text relative to the xy coordinates you lot give. The default is superlative-left, which is the la (left-ascender) anchor. According to the documentation, la means left-ascender aligned text.Horizontal Anchor Alignment
l (left) - Anchor is to the left of the text. When it comes to horizontal text, this is the origin of the starting time glyph.m (middle) - Anchor is horizontally centered with the text. In the case of vertical text you should employ s (baseline) alignment instead, as it doesn't change based on the specific glyphs used in the text.r (right) - Anchor is to the right of the text. For horizontal text this is the advanced origin of the final glyph.s - baseline (vertical text only). For vertical text this is the recommended alignment, because it doesn't alter based on the specific glyphs of the given textVertical Anchor Alignment
a (ascender / top) - (horizontal text only). Anchor is at the ascender line (top) of the first line of text, as defined past the font.t (top) — (single-line text merely). Anchor is at the top of the text. For vertical text this is the origin of the outset glyph. For horizontal text information technology is recommended to utilise a (ascender) alignment instead, considering it won't change based on the specific glyphs of the given text.m (centre) - Anchor is vertically centered with the text. For horizontal text this is the midpoint of the first ascender line and the last descender line.s — baseline (horizontal text only). Anchor is at the baseline (bottom) of the beginning line of text, only descenders extend below the anchor.b (lesser) - (unmarried-line text only). Anchor is at the lesser of the text. For vertical text this is the avant-garde origin of the last glyph. For horizontal text it is recommended to utilize d (descender) alignment instead, considering information technology won't change based on the specific glyphs of the given text.d (descender / lesser) - (horizontal text simply). Anchor is at the descender line (bottom) of the last line of text, as defined by the font.Anchor Examples
create_anchor.py. Then add this lawmaking to it:# create_anchor.py from PIL import Epitome, ImageDraw, ImageFont def anchor(xy=(100, 100), ballast="la"): font = ImageFont.truetype("Gidole-Regular.ttf", 32) prototype = Image.new("RGB", (200, 200), "white") draw = ImageDraw.Describe(image) describe.line(((0, 100), (200, 100)), "gray") draw.line(((100, 0), (100, 200)), "grey") depict.text((100, 100), "Python", make full="black", anchor=anchor, font=font) prototype.salvage(f"anchor_{ballast}.jpg") if __name__ == "__main__": ballast(anchor) xy position is. If you lot run this with other settings, you can meet how the anchor affects it.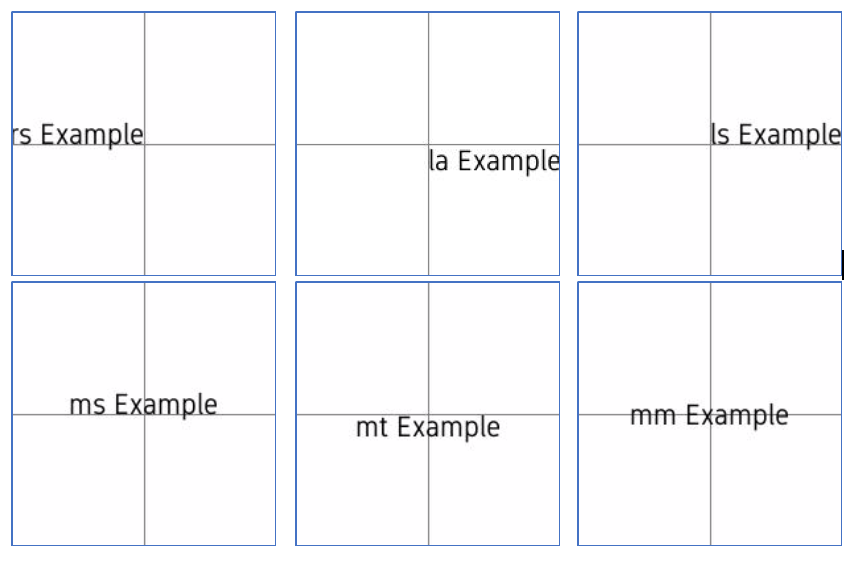
Wrapping Up

Source: https://www.blog.pythonlibrary.org/2021/02/02/drawing-text-on-images-with-pillow-and-python/
Posted by: hammittlever2000.blogspot.com
0 Response to "How To Draw Text In Python"
Post a Comment