

Do You Have To Retune Bow After Adding Draw Weight

There is something enchanting nigh the idea of crafting something from scratch with i'due south ain easily – looking at a piece of dead wood and seeing something more and then breathing life into it again in the shape of a bow.
Hundreds of thousands of people have made their own bow from woods, and they all started somewhere. Whether you're looking for a deeper connection to the sport of archery, trying to discover your roots in hunting or y'all're looking for your next claiming in woodworking; today, you can first here.
This build-along shows yous how to arts and crafts a laminated apartment-board longbow.
For this build-along nosotros volition be aiming at constructing a 45# at 28" hickory longbow.
Pro-Tip: Don't be upset if your bow ends up pulling #20 at 28" – it happens more than yous'd think. Being a bowyer takes exercise and patience.
What yous'll need
- One 1-ane/2″x1"x72" slice of hickory
- Optional Osage riser blank
- Hickory backing
- Optional phenolic tip overlays
- Unibond Wood Mucilage
- Clamps
- Sandpaper (from sixty grit on up to 300)
- Farrier's Rasp
- Depict knife
- Band saw (optional, and can be completed without it, but this will brand your life a whole lot easier)
- A circular file
- Epoxy
- Tillering stick (sometimes called a tillering tree)
For this build-along nosotros'll exist making a hickory longbow; although you might be more interested in making a recurve bow, that's not a keen place for a beginner to offset. Hickory is not the only bow wood you lot tin can use; in fact you will notice countless videos and tutorials online showing you how to brand a self-bow from ruby oak, a inexpensive, brittle woods that is easy to come past and like shooting fish in a barrel to break. However, hickory is, perhaps, the all-time wood for a beginner to start with because information technology can handle pinch and tension better than red oak. Further, hickory has very skilful operation and speed and it volition be a picayune easier for a beginner to tiller because the woods is a little softer than red oak.
Pro-Tip: Hickory is likewise great because it can be backed past its ain forest. You can accept a 1/8" strip of lumber off with a tabular array saw and flip it end for end and contrary it, so glue this piece back on and you lot are good to go.
There are no specific schematics or a plan to print, merely I'll try my best to provide as detailed instructions every bit possible. Nevertheless, you tin can learn more from ourbooks and DVDs.
Making the Crude out Marks
Every slice of wood is different – for that reason, every bow is different, and then there is no perfect guide or set of measurements, simply hopefully these will help you along.
Notice the middle of your bow stave (i.eastward. 36" would be the middle of a 72" bow).
Mark the middle.
Mark 6" on either side of the centre – this will eventually become your handle.
Mark 1" on the limb side of your 6" marks – these lines signal where you will start your taper.
To marker the heart of your bow, measure out upwards three/4″ from the edge of the bow and put another mark perpendicularly on your centre mark. Now, you should have a + in the centre of your bow.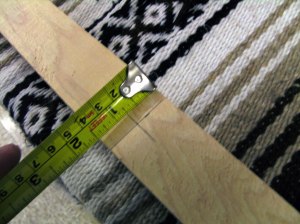
Take a string that is longer than your bow and run information technology across your bow. Attach a weight on either end; yous might discover it easiest to use squeeze claps.
Move either terminate of the string on the tips of the bow until the cord is resting as close to the middle of the ends of the bow equally yous peradventure tin can, while ensuring the cord is running straight through the middle + of the bow.
Make a mark on either end of the bow directly under the string. Connect the marks on each tip, running through the center + on your bow.
At either tip of the bow, mark ane/iv″ on both sides of your heart mark.
Connect each marking to their corresponding ane" marking.
This should make a taper from your handle to the end of your bow.
Adjacent, starting from your i" mark, draw a line to 3/8" above the tip of the bow (this will shape the belly of your bow).
Let's Get Cutting
- Clothing safe glasses while cut
- Never affect the bract while it is moving
Although a band saw is the all-time tool for the task, there are a number of hand tools that volition also work such as yourdraw knife.
Remove the marked sections.
Pro-Tip:A bow edifice vise , c-clamps, work bench or stave press all start to come in handy at this point.
Congratulations, you accept the belly and the sides roughed out.
Rounding Out the Rough Edges
Make a mark on the side of both tips 1/4″ to a higher place the back of the bow.
Draw a line connecting the points.
Using your rasp, round out the edge of the belly of your bow.
Pro-Tip: You may want to clamp down the bow, so y'all can apply both hands during this process.
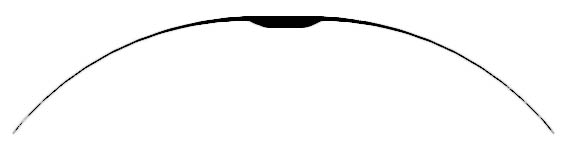
You will desire to round the edges from the belly to the 1/4″ line that y'all drew earlier.


The goal is to brand your bow become from the top image to the bottom image (looking downwards the bow).
OPTIONAL – Attaching the Riser
Although your hickory bow doesn't necessarily need a riser, it can still be desirable to accept. The riser (your handle) acts as a finish for each limb, which stops the flex from traveling through the middle of your bow. It is that travel, which will sometimes cause the miracle of a riser popping off of the bow. This is why in that location is a one" buffer on either side of the riser and this is also why you add the riser before you start the tillering process. If you lot start the tiller before you add together the riser the wood volition "remember" flexing through the handle, which could cause your riser to pop off.
Feel gratuitous to play around with different kinds of wood for the riser (adding dissimilar colors and species of wood can really requite your bow a custom, beautiful look). However for this build-along we'll be using a 3/4″ x 1-1/2″ x fourteen″ Osage bow handle blank.
Make a marking indicating the heart of your bow on the side of your handle.
Make a marker on the side of your riser indicating the middle of the riser.
Marshal the ii marks.
Glue your riser to the handle (on the belly side) of your bow.
Be sure to utilise enough of wood mucilage (I recommend using EA-twoscore because it has more longevity than regular wood glue) – making sure to mucilage both surfaces, this will ensure y'all don't have any dry surfaces.
Pro-Tip: You might want to put a piece of wax paper nether your work area to avoid making a big mess.
Clench the riser down with c-clamps.
Pro-Tip: Put a textile or another piece of fleck wood betwixt the back of your bow and the c-clench to avoid scarring the woods.
Mucilage will ooze out everywhere, only that'due south why we put wax paper down. This whole process can prove to exist a little bit tricky, as the riser will effort and move while you lot're attempting to clamp it downward. This volition atomic number 82 to a kind of twist-and-correct action on your role, but information technology's non impossible.
Pro-Tip: This would exist a great time for a second pair of hands.
Later gluing on your riser, have the phenolic tip overlays (you also have the selection of using wood of differing thicknesses, and using different species of wood to requite your bow a nicer look) and epoxy them to the tips (making sure to apply epoxy to both surfaces) – on the back of your bow.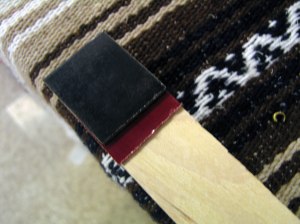
Pro-Tip:For a more traditional look, you can ever use horn nocks .
Just like the riser, clamp downwards the tips with c-clamps.
After y'all've glued and clamped everything down it's time to walk away.
Later you've waited for at least 24 hours, remove the clamps and gear up to remove the excess wood on the riser and at the tips of the bow.
Exist sure to avoid cutting into the belly of the bow when cut the riser
Mark roughly 2-1/ii″ dorsum on either cease of your riser.
On the side of your riser, from the mark you just fabricated draw a line in a crescent shape to the belly of the bow.
Remove the marked department, blending the riser into the limb of your bow.
You can use a band saw to remove this section, merely it would be safer to apply a rasp file.
Pro-Tip: If you're going to employ a file, clamp the bow downwards. By clamping the bow, yous will exist able to employ both easily to remove excess woods.
Nosotros're going to get out the sides of the riser squared off for now, so it volition sit down flat in the tillering stick after.
Backing the Bow
Although there are a number of unlike materials that can be used to dorsum a bow, for our purposes, we will be bankroll the bow with hickory and EA-forty .
Although there are many materials you can choose to back your self-bow (such as fiberglass , snake peel , bamboo , rawhide, sinew, and even cotton wool) for this bow hickory will give you the nearly longevity and protection from breaking.
Pro-Tip: You might be thinking that you don't demand to back your bow, and you might be correct, but you lot're probably wrong. Think of a toothpick. What happens when you lot bend a toothpick? One side, the back, volition splinter and pause. Your bow is like a behemothic toothpick, the backing will assist to prevent your bow from splintering and corking, which is why y'all back your bow before you tiller your bow.
Again, it might be a good thought to put some wax paper down to keep your workspace clean.
Employ a thin layer of EA-forty Bow Glue onto the back of the bow.
Use a strip of hickory on the back of the bow that runs the length of the bow.
Clench the backing to the bow with c-clamps.
Permit the Smoothen-On EA-40 Bow Mucilage dry out for at least 24 hours.
After 24 hours, gently sand the hickory to knock off any burrs or backlog Smooth-On EA-twoscore Bow Gum.
Utilize your depict knife or a band saw to remove whatever backlog hickory that might exist hanging off the sides of your bow.
Be sure not to cut your bow, merely the excess backing.
Employ sandpaper to shine out the sides of the bow.
Adding the Rough Nocks
Draw a line 1" from the tip – making the bow seventy" from nock to nock.
Using your file, cutting a notch where the line is marked on the back of the bow (where you glued the tip overlay earlier).
Next, using your file cut some other notch on the side of the bow at well-nigh a 45 degree angle.
Piece of work the file so that y'all don't have whatsoever sharp edges and that both sides match each other.
Don't cut the nock then deep that y'all can't brand adjustments afterwards, but be certain to cut it deep enough that it volition hold onto the string deeply.
Time to Tiller the Bow
Successfully tillering a bow takes time and is difficult to teach, fifty-fifty in person, so in that location is merely so much that you can learn from reading without just going and doing it. That said, be prepared to pause a few bows.


Pro-tip: Never pull the bow past your desired weight. This means that if, later you beginning string the bow, yous pull 45# at the offset notch on the tiller stick then you need to stop and achieve a good tiller. After you've gotten a adept tiller, repeat the procedure, if you are still pulling to the same notch, then cautiously remove some more than material from the bow. Once you can successfully pull the bow to some other notch at 45#, re-tiller the bow. Proceed this process until yous've achieved your platonic draw length.

For this fleck, you will demand to either construct or purchase a tillering stick and a tillering rope .
The tillering stick allows you to draw the bow to different lengths, stand up back and examine the limbs to see how y'all demand to work the bow.
Pro-tip: Your tillering rope needs to be long plenty that you can put it on the bow and notwithstanding have enough of slack.
Pro-tip: If yous don't have a bow scale (and if you lot're following forth with this build-forth, I'thou guessing you lot don't) information technology'due south a smart thought to put a bathroom calibration nether your tillering stick . This fashion, when you pull downwardly on the string you tin can see what poundage the bow is pulling. Just retrieve to either nada out your calibration with the tillering stick on it, or subtract the weight of the tillering stick from the weight yous're pulling to get the actual weight of the draw.
You'll start the tillering process by pulling downwardly just a few inches
Pro-Tip: It would exist a good thought for you to make i of Eric Krewson'southward tillering gizmos , which actually takes a lot of the estimate work out of the tillering procedure (this is a great tool for beginners, I can't overstate this) – you can use this tool at caryatid or on the tillering stick.
Longbows generally are never braced lower than vi inches and many modern longbows like to be braced at or effectually seven inches. Your caryatid height is the distance between the string and the belly of the bow. Brace summit is adamant from the deepest portion of the grip. Nevertheless, you can measure your caryatid elevation from whatever point on the bow you wish, back to the string. Some folks measure out from the middle of the sight window, some from the belly side of the arrow shelf, and some from the deepest portion of the grip. If you're discussing brace height with someone, make certain y'all're both on the aforementioned page. Regardless of where you measure from, brace height is a critical measurement for tuning your longbow or recurve. For measuring caryatid height, zippo beats a T-Foursquare .
Some things to remember when tillering:
- When tillering, you will want to avoid the hinges and remove wood from stiff areas, so the bow bends equally
- Whenever yous remove wood from one place on a limb call back to blend it with the rest of the limb
- After you've worked one limb be sure to equally work the entire other limb, and so that both limbs are even
- Move slowly – one inch down the tillering stick at a time
- More than flaws will show upwards the farther y'all bend the bow, so if you pull the bow and see a flaw, stop and fix it
- Your standard tiller procedure will await something similar this:
- Brace the bow on the tillering stick ; you should non go to total brace starting off, keep it depression, 2-3"
- Do the limb 30-50 times by pulling the bow to where it is currently braced and so relaxing information technology
- Identify the string on the desired notch and level the bow
- Stride dorsum and evaluate the limbs for areas that need to be worked
- Mark the surface area that needs to be worked with a pencil and unbrace the bow
- Bring the bow to your work area and clamp it down
- Use a block sander or a scrapper to remove stock from the wood
- Recollect to remove only a fiddling wood at a fourth dimension, as fifty-fifty removing a small amount can make a large departure
- Repeat until you have your desired tiller
- Whenever you remove any woods from the belly, yous should exercise the limbs at least 30-50 times
Pro-tip: Count your strokes and mirror the number on the other side – especially when you're simply reducing the weight of the bow and not fixing any flaws.
Pro-tip: At times, you might want to flip your bow around. This will help give you a fresh perspective on the project.
Remember, nosotros're shooting for a 45# at 28" bow, which means you should never pull the bow across that 45# threshold – you don't want to put unnecessary stress on the bow.
You should ready several milestones for yourself during the tillering procedure. Remembering that tillering is more of an art than an verbal science, the starting time of those milestones should be something like 30# at 20."
When you outset string the bow with your tiller rope you will have a lot of excess. Pull downward on that excess and see how far down it is when the limbs just start to bend. What e'er the altitude and weight, double it and that will be your beginning target milestone.
By taking a slower, more than conservative approach to the tillering process you lot're giving your bow the best chance of avoiding a intermission.
Later you reach your first milestone you will desire to string your bow at half-brace.
Now, you will want to pull the bow to 30# again and cheque how far you're pulling , since you're half braced y'all tin can await it to be less than 20."
At this signal you might want to use a 2x4x4 (or, yous could continue to use Eric Krewson's tillering gizmo ) and slide it along your bow to find potent spots you couldn't normally grab with the naked eye.
There will be a gap between the block and the bend of the bow. On a perfectly tillered bow, as you slide the cake downwards the limb the gap volition stay the same. If, however, the gap gets bigger and and so smaller information technology means that yous take found yourself a hinge. If the gap does the opposite, gets smaller and and so bigger, y'all've institute a flat spot.
At this point you will desire to creep your manner to about 40#, remembering to move one inch at a fourth dimension and to take out whatever flaws as shortly as yous meet them.
Don't forget to practice the limbs.
After you lot've accomplished your second target, it's time to move your bow to full brace.
At total brace check for flaws and correct them if necessary.
Information technology's also a practiced idea to check string alignment when yous first enter full caryatid.
Over again, moving slowly, one inch at a time, bring your bow to your desired weight and depict – for our purposes that would be 45# at 28."
Pro-tip: You might want to get out the bow a piffling heavy (a pound or ii) as the bow will weaken slightly equally it breaks in.
Later y'all've achieved your desired depict weight and length it's time to bank check if you lot have a positive tiller. A positive tiller is when i limb bends more than the other limb. The limb that bends more is ordinarily chosen to be the superlative limb.
To bank check for a positive tiller, measure from the end of the fade nearly where the riser and limb meet to the string on both sides.
If you're top limb has a gap 1/8" bigger than the bottom limb, then you lot have a 1/8" positive tiller. Don't feel bad if your positive tiller is closer to 1/4″ or fifty-fifty i/2."
Pro-tip: A positive tiller is not a requirement though, a zero tiller is adept too, just not a negative tiller.
Time to cut the arrow residual
Draw a line on the handle (belly side) in the middle, both horizontally and vertically (y'all should end upwardly with an +). Depict a line i" up the bow from the center (vertical | ) marking (toward the top of your bow).
 Pro-Tip: You lot are not doing a cut-to eye shelf, as this would exist too much for a self-bow. It should exist at least 1/8" away from the eye of the bow. In fact, you could avoid cutting the shelf altogether and simply shoot off the knuckle.
Make a mark 1/iv″ down from the horizontal (-) centre line. Connect those points to make a box.
 The corner of that box indicates the within corner of your pointer remainder.
 Depict a slopped line from the corner of the box to the corner of the handle.
 Cut out the marked section.
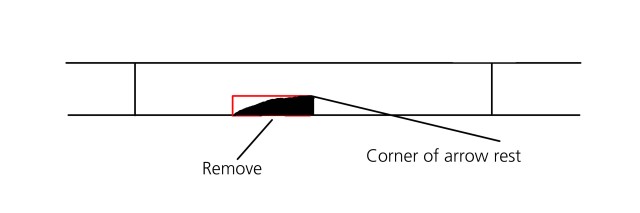 Pro-Tip: These images are for a right handed shooter; flip the images for a left handed shooter.
Using a rasp , round file and sandpaper, round off the pointer rest.
Currently your arrow residual should expect something like this. You want to round off the arrow residue until information technology looks something like this.
 This will make it so the arrow will merely residual in the middle of the ledge, which volition cause less resistance and relieve some pointer fletchings.


Y'all will as well want to use your circular file to round out the within corner of your pointer rest; currently it should look similar the top prototype, y'all want it to wait like the bottom image.
You might want to round-out and alloy-in the residue of your pointer rest, but that is purely up to you lot.
Shaping the Handle
Using your rasp start shaping the handle to expect more like a pistol grip.
Pro-Tip: An piece of cake way to practice this is to simply concur the bow and meet what feels like information technology should exist shaved off; making sure it fits your grip.
Make the grip asymmetrical – that is, both sides should mirror each other (this is purely optional, merely information technology helps give information technology that prissy pistol grip shape) .
You don't desire to take too much off while shaping the handle.
After you've gotten the handle to experience right in your hand, use some sandpaper to have off the crude edges.
First with a 60 grit and move up to a 220 grit – this will make your grip a delight to concur.
Rounding out the Nocks
Use your rasp and sandpaper to shape the nock into an inverted teardrop shape.
This is where the tip overlays we added start to come up in useful; if you lot added different woods, your tips will really popular.
By making the tips of your bow a bit smaller it will speed up the bow and will also reduce hand daze.
There is no exact scientific discipline to shaping the nocks, just you will want to exist sure to maintain your good string border.
Try and await online to encounter what others did.
Terminal sanding
The final sanding will shine out the whole bow and have out whatever tooling marks that might still be around. It takes out any squared edges that are still visible and makes the whole bow smooth.
Be certain to sand the full belly of the bow to ensure consistency.
Don't remove wood from the bow – you want to avoid tillering the bow at this point.
People start at different grits at this stage, but the higher the better – a 220 grit is a expert idea to kickoff with, but sanding with a 100 grit then moving to a 220 grit is okay too.
The higher grit you go, the smoother your bow will be – consider working your way upwardly to a 400 or 600 grit.
Finishing the bow
Make clean the dust off with mineral oil
You have the choice of staining the bow at this bespeak, the colour and kind of stain you get is all personal preference. Yous also have the option of only clear blanket your bow.
Many people likewise cull to pigment the back of their bow:
- This procedure is simple and inexpensive
- Lay out some wax paper
- Use painter's tape to cover the areas you don't want painted, and spray paint the back of your bow any color you want
- After the paint has dried remove the painter'southward tape
Later yous've stained and painted your bow, yous will want to coat it (at least the belly) in polyurethane .
After the stain is dry, clean your bow with mineral oil
Lay out some wax paper and spray glaze your bow in the polyurethane .
Wait 24 hours, gently sand the bow with 220 grit sandpaper and coat again.
Pro-Tip: You don't have to await the full 24 hours, only information technology's a good idea if you're going to requite it that final sanding.
The final sanding is optional, but it will knock off any burrs that might take gotten stuck in the start coat of polyurethane.
Apply at least 1 more coat of polyurethane (some cull to coat their bow as many as five times).
Sign the bow with your proper name, engagement, draw length and weight.
Pro-Tip: Yous might desire to sign your bow before your final coat of polyurethane to protect your markings.
Congratulations! You've built your first of many bows; experience costless to customize your bow with a leather grip, pointer rest and plate , and any else you might fancy.
If you're looking for a longbow kit with everything you lot demand and none of the work done, y'all might consider trying our hickory flatbow blank self bow kit. .
Or, if yous're looking for something a little different with all of the dull work already done, y'all should endeavor ane of our bow building kits.
By Jason D. Mills

Source: https://www.3riversarchery.com/blog/beginners-guide-to-building-a-hickory-longbow/
Posted by: hammittlever2000.blogspot.com
0 Response to "Do You Have To Retune Bow After Adding Draw Weight"
Post a Comment