

How To Draw Eyelashes In Photoshop
Eyelashes enhancement and correction
March 1, 2022 at 1:16:40 PM GMT+2
Contents
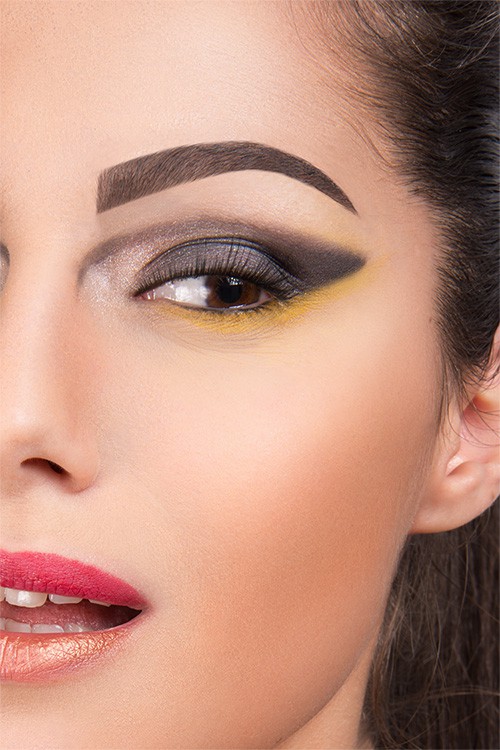
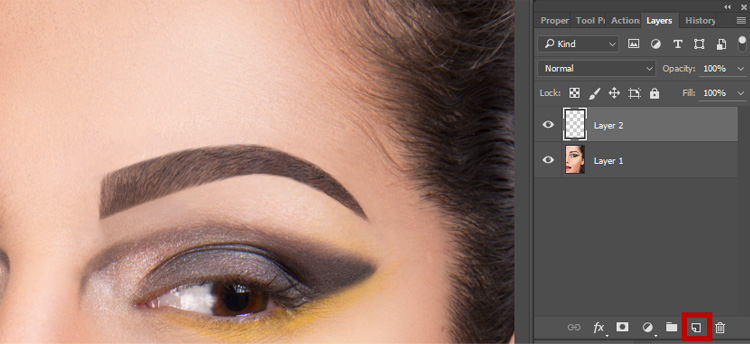
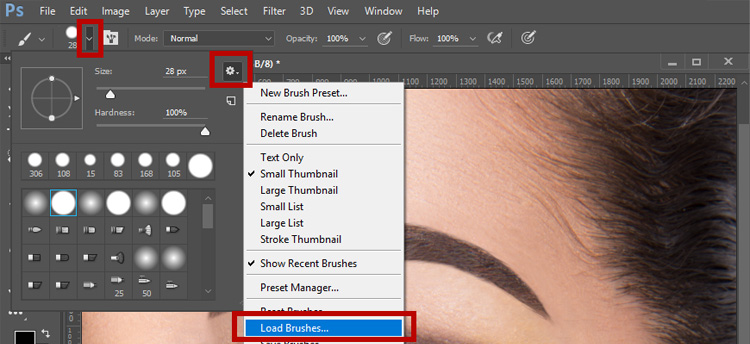
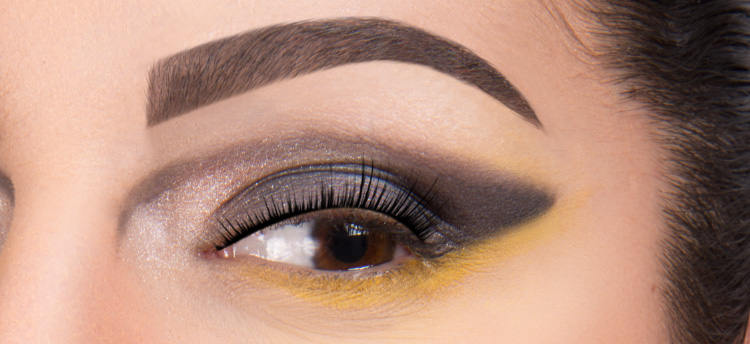
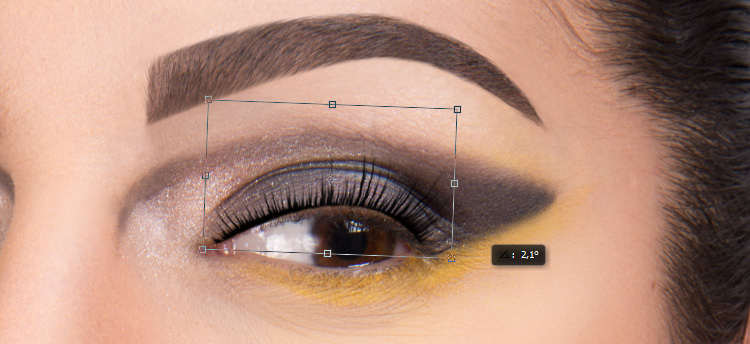
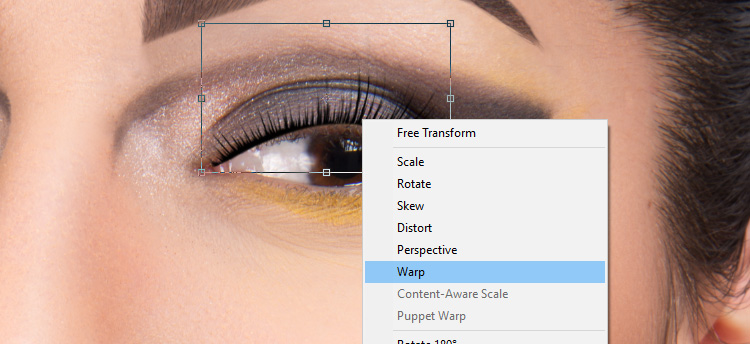
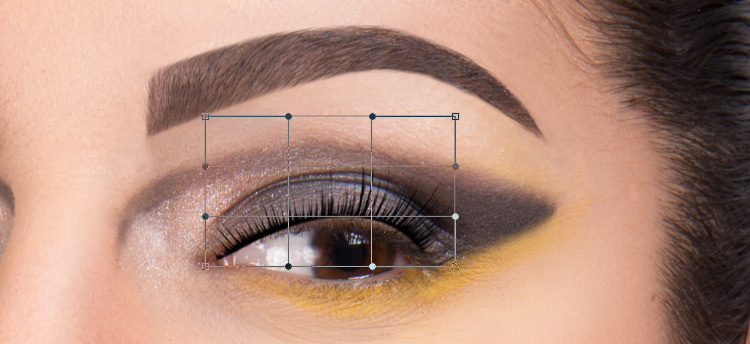
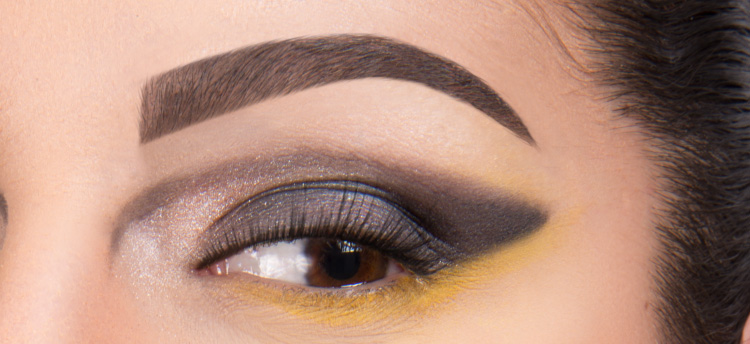
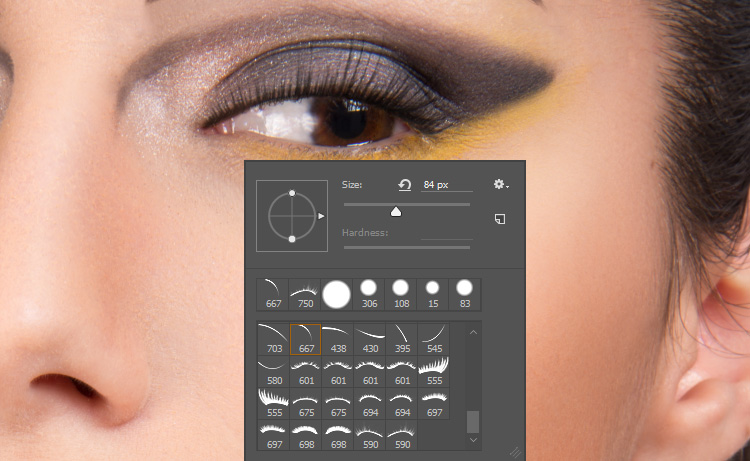
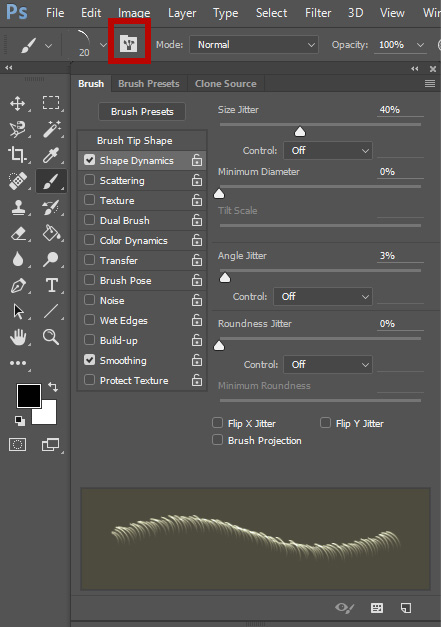
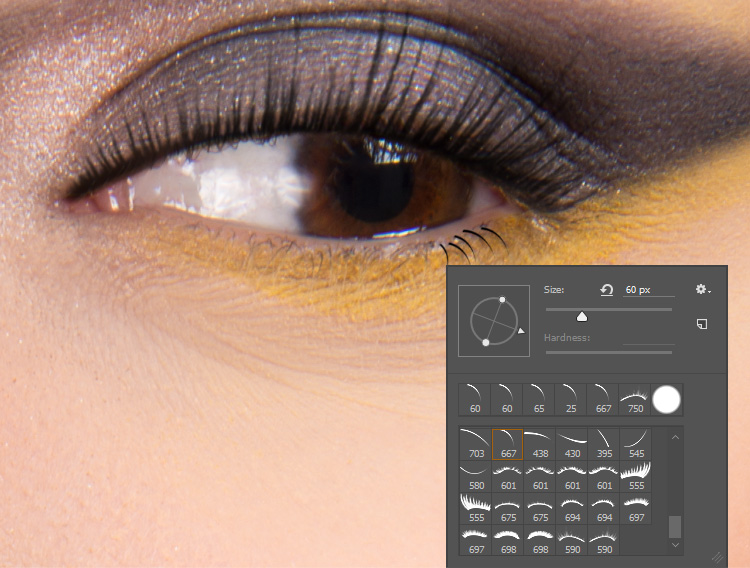
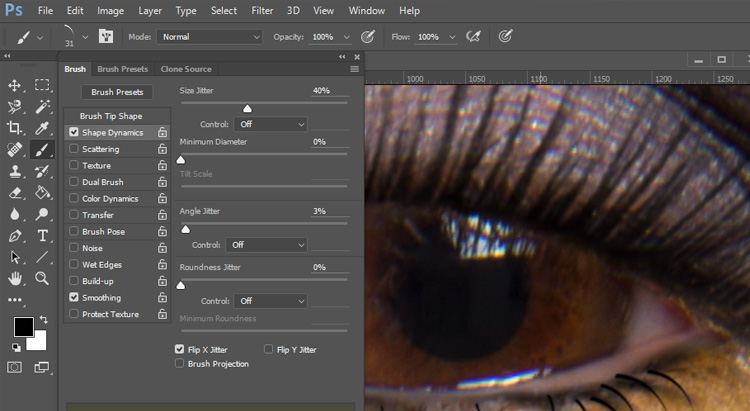
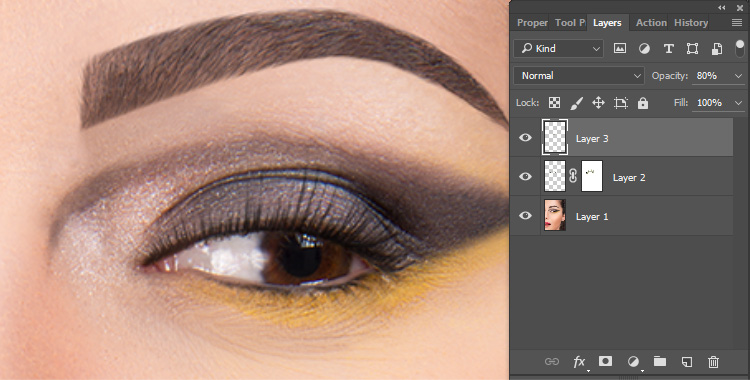
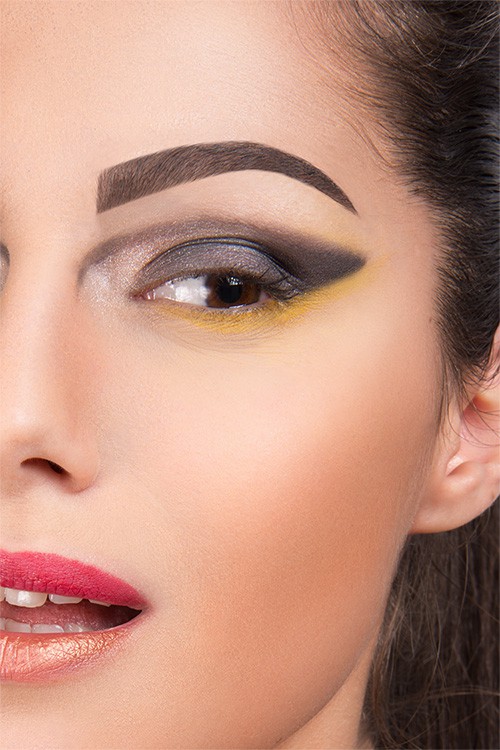
This lesson is office of a larger section on enhancing eyes photos in Photoshop. For a more than detailed study of photo retouching nosotros recommend you lot to read the other articles on the topic: It is quite difficult to retouch the lashes, considering, in fact, they must be non edited, simply created. To simplify this task, we volition utilise the Corey Barker's brushes, who together with the professional person make-up artist Shelley Žiar has developed a castor set for creating gorgeous lashes. In this article, we will sympathize how to employ the brushes from the Corey Barker'due south set to create the eyelashes in the portrait photos. Step i We will add amazing lashes to the optics of a model in this photo. Volition create the eyelashes on the carve up layers. So outset of all, at the bottom of the Layers panel, click on Create a New Layer. Step two. Download and adding intro Photoshop eyelashes brusshes Download this set of brushes using the link from our website. To add these brushes to Adobe Photoshop, activate the Brush tool and then click the icon with a brush on the toolbar to open the brushes palette. Open the Carte du jour of the brush palette and select the command "Load Brushes". Unzip the annal and enter the path to the file - Scott_sEyelashBrushSet.abr – and and then click on Open. Step 3 A new prepare of brushes for painting eyelashes will appear at the bottom of the palette, below a standard set of brushes. There are two copies of each brush for painting on the left and correct eye. Some of the brushes have 700 pixels' size, so you can apply them for the high resolution images. The merely drawback is that those who practise non piece of work with the high-resolution images accept to reduce the default brush size to match your photo. To practice this, just alter the value of the Size parameter at the pinnacle of the palette brushes. Select the advisable model brush. We used the "Cat eye natural lashes". Step 4 Zoom in an image of the eye. At the brushes palette decrease the size of the selected brush until information technology approximates the size of the eye which you lot want the eyelashes to add to. Movement the brush to the place where information technology can be used to estimate its size. Printing <0> to fix the black colour as the chief, and click near the surface area where you want to add an image of the eyelashes. Ane click is not enough to put the eyelash in exactly the correct place, and you volition need to either motility information technology, or plough, or even both. Notwithstanding, now we accept a place to start. So feel free to click one time every bit shown in the effigy. Don't forget that the eyelash is added to the internet layer nosotros created in step one, so nosotros have a complete freedom when changing its size and shape. To get the best effect and save your time we recommend to order photo editing by professional retouchers - from $3 per photo. Order Retouching Step 5 To make an eyelash confirm the image of an eye, it needs to be deployed. Use the key combination < Ctrl + T > (< ⌘+ T >) to run the command Free Transform. Click inside the bounding box and drag the eyelash to a more than accurate surface area. Movement the pointer exterior the bounding box. It will go a double arrow. Click and elevate the pointer and then that the lash looks meliorate in the image of an center. Step 6 To make the image of the eyelashes match perfectly with the epitome of the middle, it should be slightly deformed. Click the right mouse push button inside the bounding box and select the Warp in the driblet-down menu. Stride vii Click inside any of the nine rectangles, and drag the pointer to warp to the desired area. Click anywhere, and the eyelash will change its position similar that. You tin change information technology on your own by clicking and dragging the image every bit you like. Step eight Identify the eyelash equally desired, printing < Enter > (< Return>) to retain the completed conversion. To make the added eyelashes exist ameliorate combined with the existent and look more natural, yous can slightly reduce the opacity, for example upward to eighty%. At present the lashes await more natural. A cosmos of the upper eyelashes on the one eye is completed. However, a creation of the upper eyelashes on the second eye requires much less time because we'll use the already created upper eyelashes. For those who have two eyes in the photograph :) Press the primal combination < Ctrl + J > (< ⌘+ J >) to duplicate the layer with the lashes yous created for the other heart. Select the Movement tool and drag the upper lashes, which were created for the starting time heart, to the 2d eye. It is necessary to reflect a copy of the upper eyelashes of the center horizontally, to turn them into upper eyelashes of the 2d heart. Run the command Free Transform, then right-click in the bounding box and select Flip Horizontal. Rarely it happens that persons both eyes have exactly the same size and shape. So once again, click the correct mouse button in the bounding box, but this time select the Warp in the context carte du jour. Transform the shape of the eyelashes so that they match the paradigm of the 2nd eye. Press < enter > (< Render >) subsequently completing the conversion. Stride 9 Add a new empty layer for the bottom lashes at the peak of the listing of layers. Open the brushes palette and curl through the listing of brushes up to the brushes of single eyelash. Select a suitable brush (nosotros used the Bottom Lash 3). Reduce the brush to a reasonable size. Step 10 At present we need to describe the lower lashes. The problem is that each eyelash you draw is completely identical to the previous. In Photoshop in that location is an pick which can be used to modify slightly the size and angle of each eyelash past clicking the mouse. As a result, the image of the eyelashes becomes random and looks much more realistic. Click on the brush options pane, that is on the panel icon, to the right of the palette icon. In the left of the Castor panel, select Shape Dynamics. To automatically resize each eyelash, drag the Size Jitter slider to the position of 40%. To vary also an angle of inclination of each of the lashes, move the Angle Jitter slider to position 3%. Make certain that at the peak of the console of the drop-downwards list the Control is set to Off. The results of changing the brush stroke appear in the preview window at the lesser of the Brush console. Pace 11 The bending of each of the bottom lashes is a little unlike, so you need to consider it when drawing manually. In the upper left corner of the Brush panel, click on Brush Tip Shape. In the Central part of the panel you will see a preview of the angle of the strokes. Use this window to alter a little the brush after making every five or six clicks. Brand 5-6 clicks and slightly adjust the angle of the brush. When changing the angle, the cursor of the brush for drawing lashes changes appropriately. Step 12 Describe a few more lashes and turn the brush angle in the Brush console. When it comes to the middle of an eyelid, it is necessary to change the angle of the eyelashes to the opposite to make the lashes look natural. Thus, when y'all become to the center of the centre, select Flip Ten in the Castor panel. When you motility closer to the nose, the size of the lashes should be decreased, so drag slightly the slider Size to the left in the Castor panel. Pace 13 For the layer with the lesser lashes, reduce the opacity value to make the draw lashes look more than natural comparing with the eye. To give a lash image a little scrap of depth, add a layer way. Click the right button of the mouse on the layer, select Blending Options and select Drop Shadow in the opened menu. Reduce the opacity for instance up to lxxx%. For those who have two eyes in the photo :) We use the same method for the bottom lashes, which nosotros used for the top lashes — duplicate the layer with the image of the lower lashes for the other eye.Using the Motility tool drag the epitome of the eyelashes as accurately as possible to the other eye. Again use Gratis Transform and move the pointer outside the bounding box to rotate the epitome of the eyelashes to the desired position. If you don't desire to bother and need a professional person consequence with the hand-drawn eyelashes, we recommend you to club photo editing by professional retouchers - from $3 per photo. Order Retouching

Video tutorial

Source: https://photoretouchingservices.net/blog/view/enhancement-of-the-eyelashes
Posted by: hammittlever2000.blogspot.com
0 Response to "How To Draw Eyelashes In Photoshop"
Post a Comment