

How To Draw Double Line In Word
Lines are a bones design element. In Microsoft Give-and-take, a horizontal or vertical line can dissever a document and guide the flow of the text. You can insert a line in Word and format it in unlike ways to alter a apprehensive line into something more appealing.
It's then unproblematic after all. But if you don't know all the ways to do information technology, then this primer on how to insert a line in Give-and-take is for you.
The Quick Fashion: How to Insert a Line in Discussion With the Keyboard
Did you know that you tin quickly add together a line in Discussion by typing a few characters? Word's AutoFormat feature types stuff for you as you type it. Y'all may take already seen it in action when information technology creates automated bulleted lists.
You can not only insert a line but also add together lines with dissimilar designs. Hither's how it works:
Place the cursor in the spot where you lot would like to start your horizontal line.
And then, type three characters for any of the possible line styles you see in the screenshot below. Press Enter.
For example, to draw a dotted line, blazon *** and press Enter.
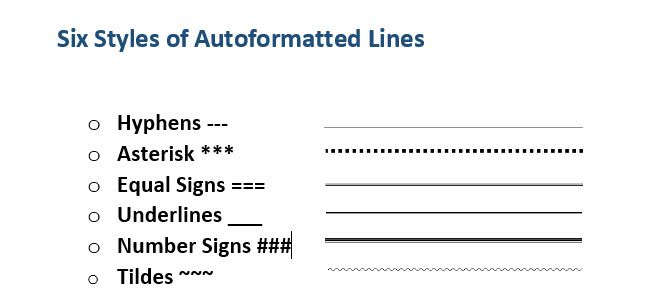
As you will see, you will become 6 variations of the standard horizontal line.
- Apparently single line with three hyphens (---)
- Cleaved or dotted line with three asterisks (***)
- Plain double line with three equal signs (===)
- Bold unmarried line with three underline symbols (___)
- Triple line with a thick middle with 3 number signs (###)
- Wavy line with three tildes (~~~)
The line takes upwardly the entire width of the page. When added inside a column, the line is inserted to lucifer the width of the column. If you want to add text above or below the line, put your cursor where y'all want the text and begin typing.
You will also detect a tiny AutoCorrect Options push button pop up side by side to the line. This is a shortcut that allows you lot to undo the automatic line when y'all don't need it, terminate them altogether, or dive into the AutoFormat options dialog.
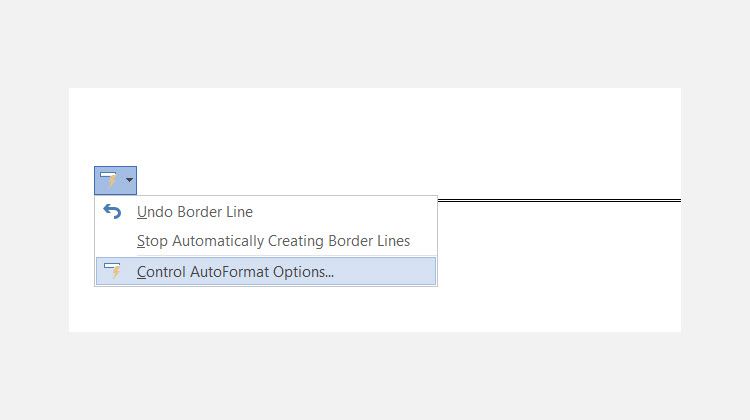
Yous tin plough off these lines permanently from the AutoFormat options dialog.
Go to AutoFormat As You Typdue east tab > Apply every bit you type section > uncheck Border lines.
Insert a Horizontal Line From the Ribbon
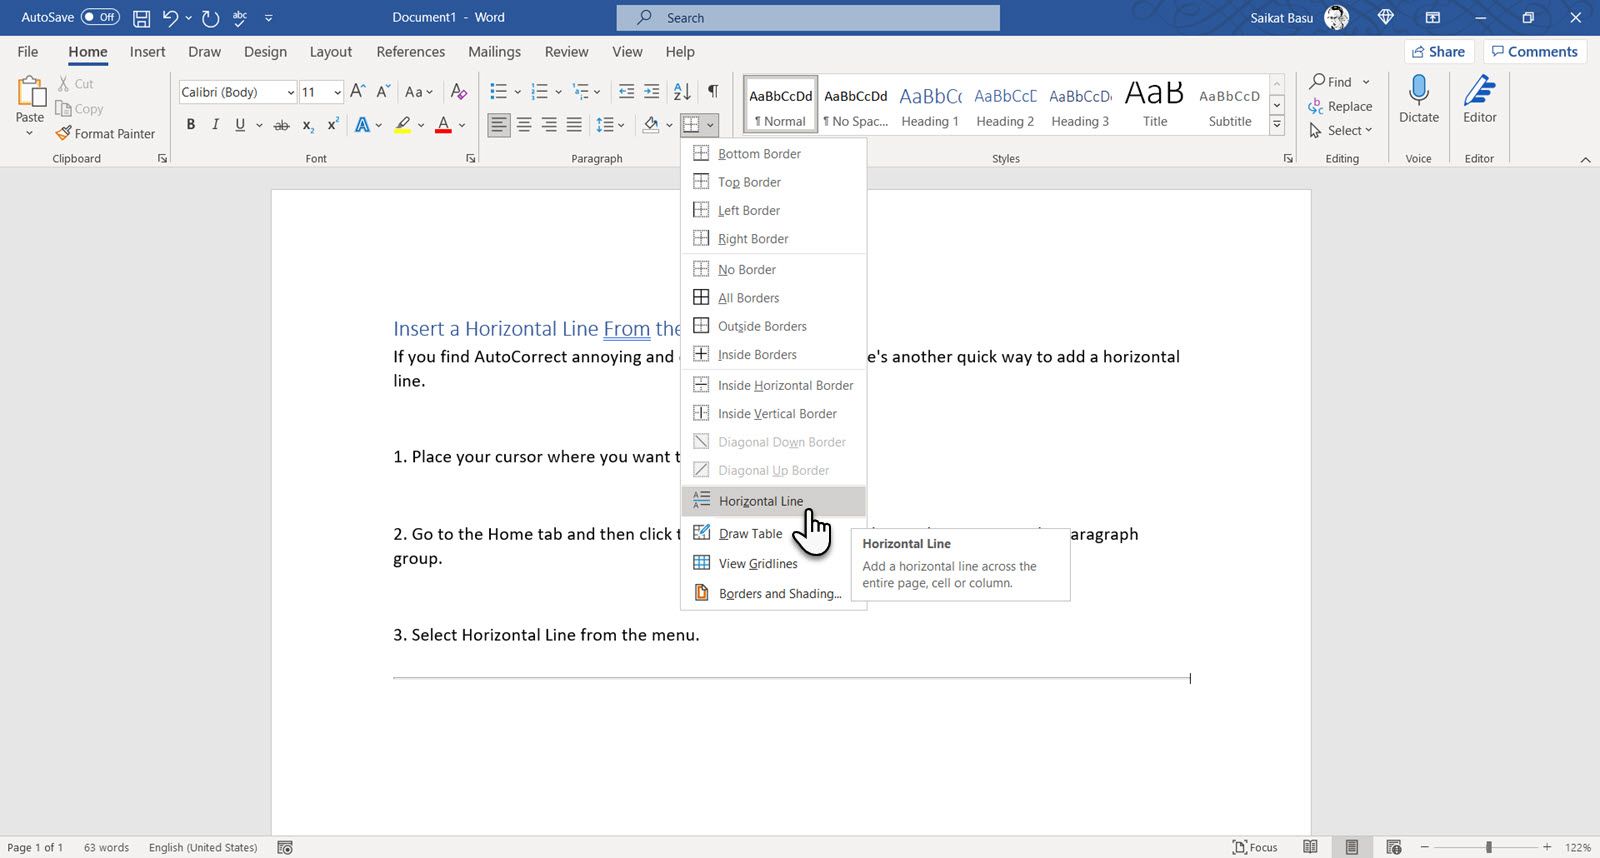
If you discover AutoCorrect annoying and disabled the option, in that location's another quick way to add a horizontal line.
1. Identify your cursor where yous want to insert the line.
two. Become to the Home tab and then click the dropdown arrow for the Borders choice in the Paragraph group.
3. Select Horizontal Line from the bill of fare.
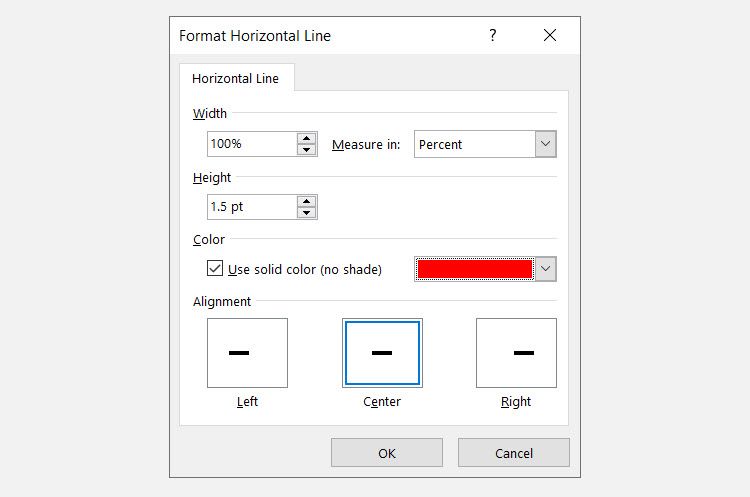
four. To tweak the expect of this horizontal line, double-click the line. The Format Horizontal Line dialog box enables you to modify the width, superlative, color, and alignment of the line.
5. To resize a line, select the line with a double click and then elevate any of the resizing points to change the length or width.
6. To remove the line, select information technology and press Delete on your keyboard.
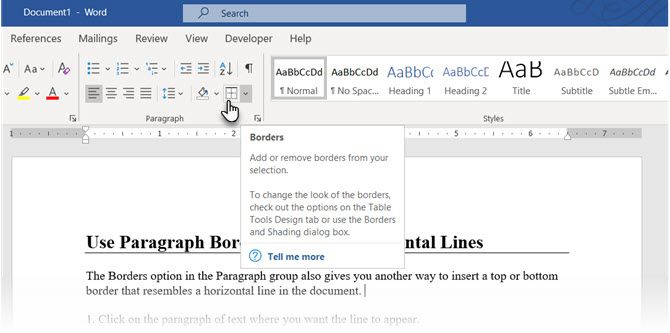
Use Borders to Add Horizontal and Vertical Lines
The Borders selection in the Paragraph group also gives you some other way to insert a top or bottom border that resembles a horizontal line in the document.
1. Click on the paragraph of text where you lot desire the line to appear.
2. Got to Abode and the Paragraph group. Click on the Border button. The Bottom edge is normally the default. This places a line below the text you have selected on the page or the paragraph if you oasis't selected whatsoever text.
3. For other options (like a vertical border), you can click on the tiny dropdown arrow on the Borders button to admission a listing of options.
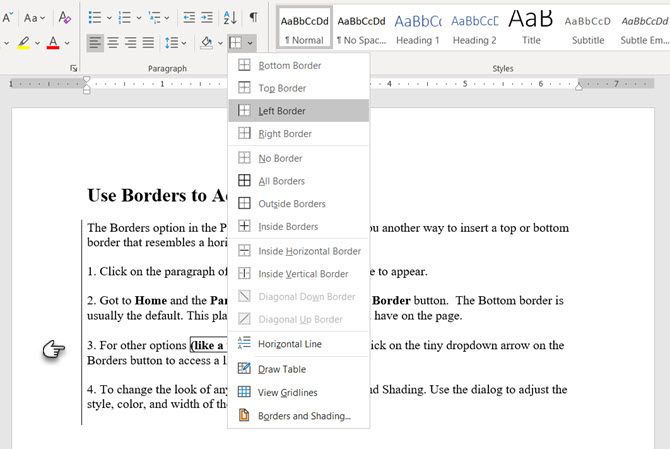
iv. To modify the look of any border, click on Borders and Shading. Utilize the dialog to arrange the style, color, and width of the border.
5. Deleting this horizontal line in your Discussion document may not be obvious only it piece of cake enough.
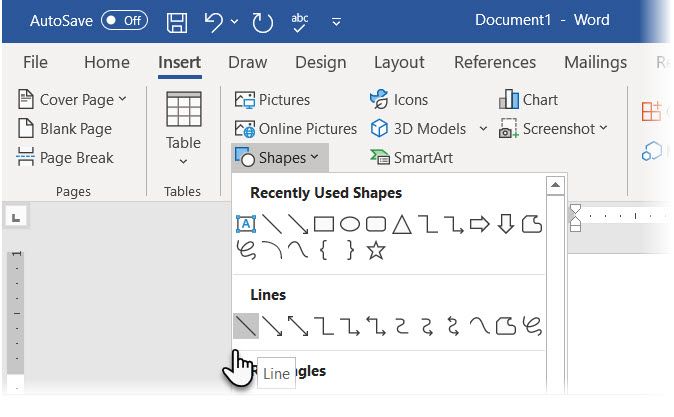
Employ Shapes to Insert a Horizontal or Vertical Line in Give-and-take
The Shapes menu contains several line options. These line shapes come with one important difference---you can draw them at dissimilar angles. Then, afterward you draw the line, y'all can customize the color and appearance to make decorative horizontal or vertical lines even in the middle of a Word document.
i. Position the cursor where y'all desire to insert a line.
2. Get to Insert > Illustrations group > Shapes dropdown arrow.
three. In the Lines grouping, choose the shape of the line.
four. Click and drag across the document with the mouse pressed till the endpoint. (Tip: Hold down the Shift key to insert a straight line that is either horizontal or vertical)
5. Go along the line selected to customize the advent of the line with the Shape Format tab on the Ribbon.
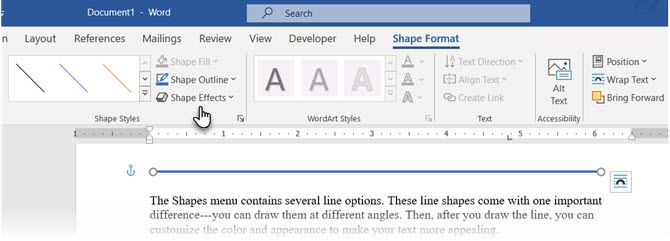
half-dozen. Go to the Shape Styles tab and modify the color, utilize a different line mode, or apply effects.
7. You tin also right-click on the line and choose Format Shape from the context menu to open more options for changing the look.
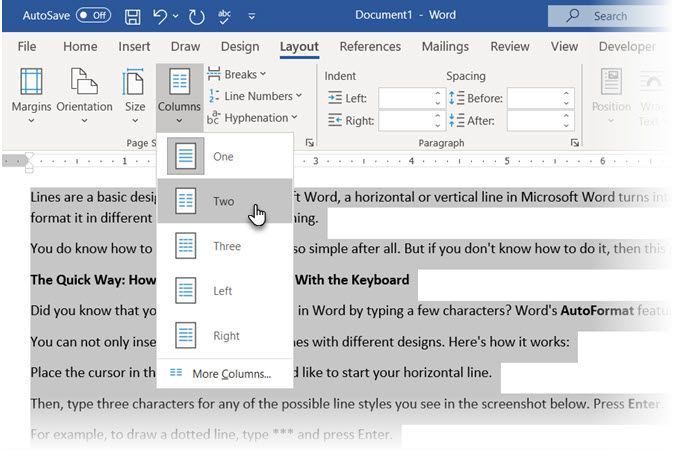
How to Add a Vertical Line and Separate Text into Columns
Text bundled into columns is a basic layout technique. You can dissever any block of text into multiple columns and besides insert a vertical line betwixt them.
1. Select the text.
2. Become to Ribbon > Layout > (Page Setup grouping) Columns. Click on the dropdown and select the number of columns you want.
3. The text is now arranged into columns. Click on any cavalcade and go to Layout > Columns > More Columns.
4. In the Columns dialog box, check the Line Between box and click OK.
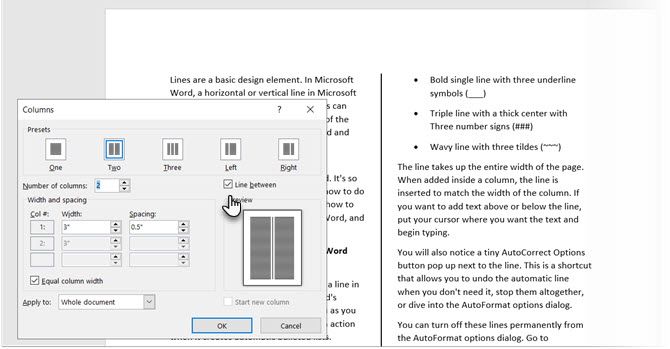
Notation that you can modify the number of columns and the spacing between them from this dialog as well.
How to Utilise a Bar Tab to Insert a Vertical Line
Tab stops in Word help align lines and paragraphs. The bar tab, on the other hand, doesn't set a tab stop. It inserts a vertical line and demarcates your paragraph into columns.
i. Select the paragraph where yous want to add the vertical line.
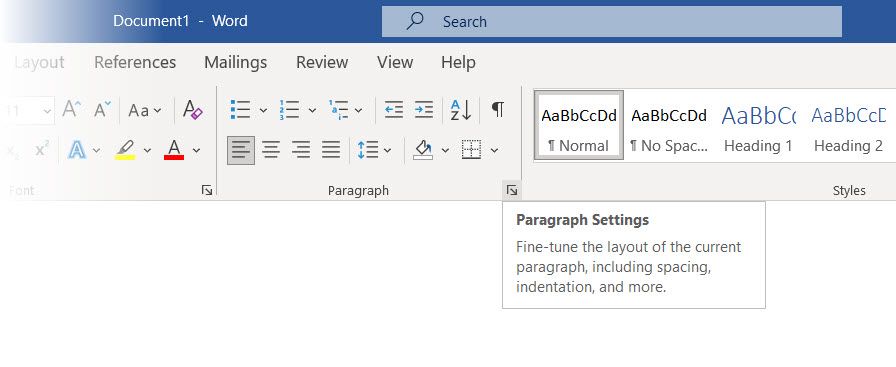
2. Get to Ribbon > Home. In the Paragraph group click the tiny pointer to open the Paragraph Settings.
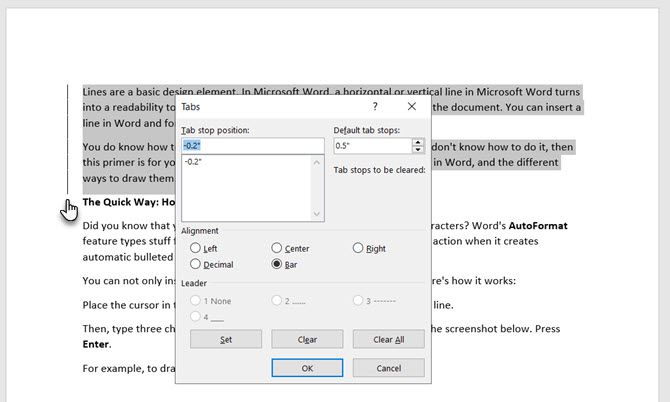
3. Click the Tabs button at the bottom of the dialog.
4. In the Tab terminate position box, enter the position where you want the vertical line to appear. You tin apply the ruler at the top of the screen to gauge a value to enter.
five. Click the Bar button in the Alignment department. Click on Set and OK.
Equally you tin see, I have set it to "-0.two" to make it appear just to the left of the first paragraph. To delete the vertical line, delete the bar tab.
Besides: Desire to make blank lines where the reader can fill in some information? You tin can employ tabs to quickly create empty lines in forms with Microsoft Discussion.
Draw a Line in Your Word Document
Horizontal lines are more obvious and common. But adding vertical lines at the right place can boost the visual appeal of your content. Lines aren't mere decorations... they tin can atomic number 82 your eye to the almost important part of a certificate when used with subtlety.
Call back about lines and apply these methods the next time you sit downwards to write a professional written report with Microsoft Give-and-take.
About The Writer 

Source: https://www.makeuseof.com/tag/how-to-insert-a-line-in-word/
Posted by: hammittlever2000.blogspot.com
0 Response to "How To Draw Double Line In Word"
Post a Comment